"Your journey to professional cloud streaming starts here."
Welcome to StableKit! This guide will walk you through everything you need to set up your cloud streaming server and start broadcasting. By the end, you'll have a fully functional cloud streaming setup ready for your first broadcast.
What You'll Need
Before getting started, make sure you have:
- A StableKit account (sign up at stablekit.app if you haven't)
- An active StableKit subscription
- OBS Studio or similar streaming software installed
- Your Twitch, YouTube, or other platform stream key (if you plan to restream)
Step 1: Create Your Account
If you haven't already, start by creating your StableKit account:
- Visit stablekit.app
- Click "Sign Up" or "Get Started"
- Enter your email address and create a password
- Verify your email address
- Log in to your new account

Step 2: Choose a Subscription Plan
StableKit offers subscription plans to match different streaming needs. To access cloud server features:
- Navigate to the "Packages" or "Pricing" section
- Review the available plans and their features
- Select the plan that fits your needs
- Complete the checkout process through PayPal
Once your subscription is active, you'll have access to create and manage cloud servers.
Step 3: Create Your Cloud Server
With an active subscription, you can now create your cloud streaming server:
- Go to your StableKit dashboard
- Click "Create Server" or the "+" button
- Choose your preferred server region (select the location closest to you for lowest latency)
- Confirm and create the server

Your server will be provisioned within a few moments. Once ready, it will appear in your dashboard with a "Running" status.
Each server runs on Google Cloud infrastructure, providing enterprise-grade reliability for your streams.
Step 4: Create Your First Ingest
An ingest is where your video enters the cloud server. You'll need at least one ingest to start streaming:
- Find the "Ingests" section and click "Create Ingest"
- Choose your preferred protocol (we recommend SRT for most users)
- Give the ingest a name (e.g., "Main Camera" or "OBS Feed")
- Click Create
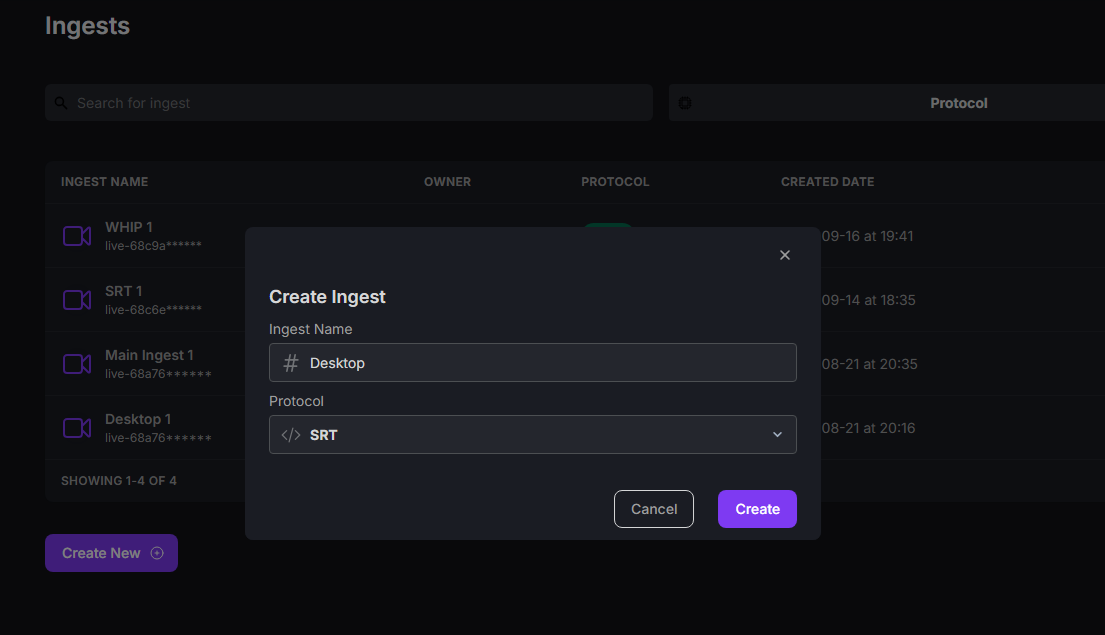
After creation, you'll see your ingest details including the Ingest URL and Stream Key. Keep these ready - you'll need them for the next step.
Step 5: Configure OBS
Now let's connect OBS to your StableKit ingest:
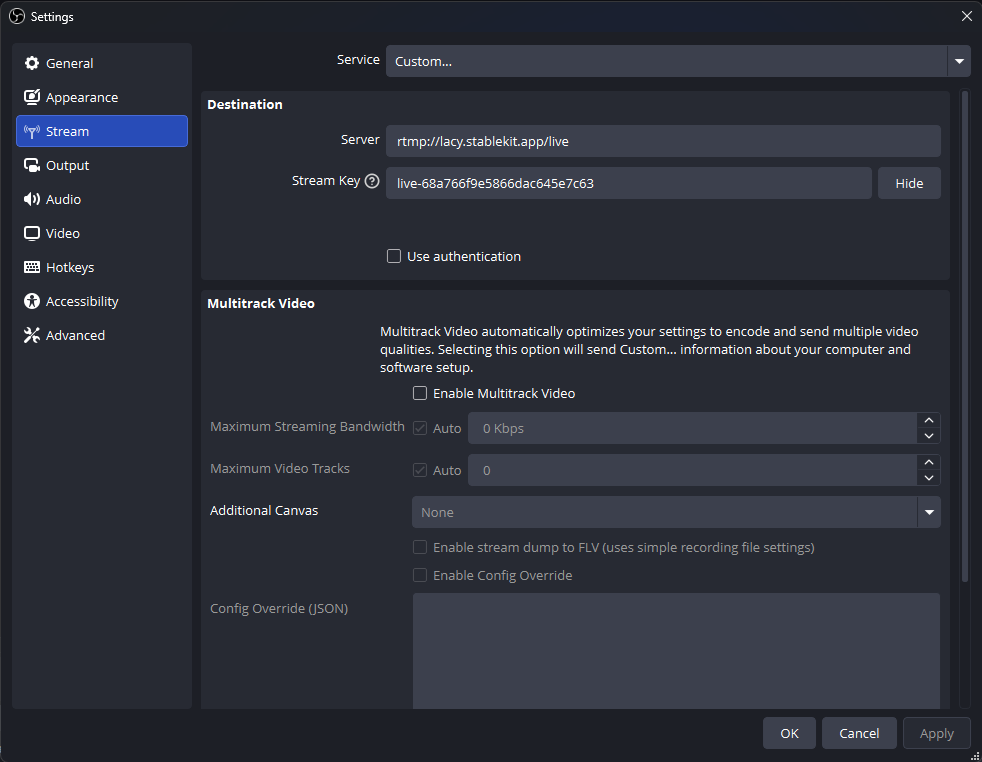
For SRT (Recommended)
- Open OBS Studio
- Go to Settings > Stream
- Set Service to "Custom..."
- Copy the full SRT URL from StableKit (it includes the stream key)
- Paste it into the Server field
- Leave the Stream Key field empty
- Click OK to save
For RTMP
- Open OBS Studio
- Go to Settings > Stream
- Set Service to "Custom..."
- Enter your StableKit RTMP Server URL
- Enter your Stream Key
- Click OK to save
Step 6: Start Streaming
You're almost there! To start sending video to your cloud server:
- In OBS, set up your scenes and sources as usual
- Click "Start Streaming"
- Check your StableKit dashboard - you should see your ingest showing as "Live" or receiving video
Step 7: Connect to Streaming Platforms
If you want to broadcast to Twitch, YouTube, or other platforms, you'll need to configure restreaming:
- After your server is running, navigate to your dashboard, click the "Virtual OBS" button
- This will redirect you to an OBS instance hosted on your cloud server.
- Configure the virtual OBS client to stream to your favourite platform or use the pre-installed Aitum multistream plugin to stream to multiple platforms at the same time.
The cloud server can stream to multiple platforms simultaneously, so you can reach your audience on Twitch, YouTube, and more - all from a single OBS stream.
Next Steps
Now that you're up and running, explore these topics to get more from StableKit:
- Understanding Cloud Servers - Learn about the benefits of cloud streaming
- What is an Ingest? - Deep dive into ingests and production quality
- Streaming Protocols Guide - Understand RTMP, SRT, WebRTC, and WHIP
- Sharing Ingests - Collaborate with other creators
- Account Security - Keep your account and streams secure
Need Help?
If you run into any issues or have questions:
- Check our Help Center for guides and FAQs
- Contact our support team through the dashboard
Welcome to StableKit - we're excited to have you streaming with us!